Wednesday, October 5, 2011

shed night ~ Wed 5th Oct

Jobs for the week:
buy a front & rear axle
get the rear hub painted & buy all the bearings & sprockets etc
head bolts all helicoiled
barrels bored to 50 thou over
exhaust port fixed

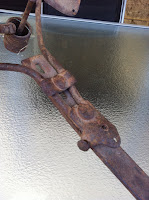
Spent the evening working on the front forks
had to remove all the powder coating from the front stays so we could pin it to the bell cranks
Chris found the right bolts to attach the spring to the forks.

still need a lot of adjusting to fit the wheel to the forks

mocked up some 741 handlebars to see how they looked

wheel is not in center & will have to be adjusted

still need to get the wheel hub cover, felt washer & cir clip on front hud so we can work out spacing

Got the bearings, axle, sprocket etc from Murray spending another $600 ! 
& bought some heat resistant paint. 


Then I taped up the bits of the 741 hub that i didnt want to paint & hit it with a heat resistant primer & enamel black top coat
I also have to cure them in an oven 
hmmmmmm
Will I use my own oven   hmmmmmm

Update Wed 12th Oct


 Dropped the barrels off to Harris Engineering to see if the rear one would clean up with a 5 thou hone ..... very doubtful

Then up to Wayne's.

The boys got stuck into fixing up the bell cranks for the front wheel. We had to create more space for the hub. Machine down the nuts & add thread. Lathe up some spacers for the outside nuts & machine an insert to reduce the axle size on my Norton hub.
Then drill in some split pin holes to secure the nut.
We got lucky as the wheel looks very close to centre.

Next step is to make spacers for the rear hub so we can lace my chief rim onto 741 hub

I put the hub in the bbq to bake the heat resistant paint

Wednesday, September 28, 2011

bloody barrels

Problems are increasing with the cylinders ....
The weld we made on the front barrrel exhaust port hadn't taken so I took them down to Murray for an opinion .....


The nasty exhaust port that is causing problems
not going to wreck my eyes this time


I had previously bought 50 thou over pistons ...
Murray measured the rear barrel at 60 thou over !
& that the front barrel  had 1/16" machined off the top. (basically the ridge that the head gasket sits on had been machined off.   also at a 10 thou angle
This risks the pistons hitting the heads
Stopped all work to reconsider.

I might have to get them re-sleeved & bored back to std. Hopefully I can swap the pistons over with Rocky in the USA.

This time we will build the bottom end first without balancing & check clearance with the heads to see if we can use the barrels or whether we have to machine the pistons down
pushing in the valve guides
Update Wed 4th Oct
took the barrels up to shed .... and let Wayne have another look
We tried fitting the pistons and as they wouldnt go thought that we should be able to be cleaned up at 50 thou over.

Update Thur 5th Oct
got out my kingchrome vernier scale ... & had a go at measuring
I got
Front 2.883
Rear 2.916  
even with my glasses on its v difficult to read off the thou scale

Update Sat 7th Oct
Dropped in at Murrays to pick up bearings and axle for 741 rear hub
He still thought that 50thou over was impossible.

First thing we leant was that Rocky's piston stamped 50thou were actually 2.933" which are actually 60 thou over
Also measured the thickness off the top of the piston at 5mm
Also learnt about the taper of a piston at roughly 4 thou & that the sides are different ..... thrust side & cudgeon pin side differ by 1 thou ?

Then cleaned the rust out of both bores with a drill bit spindle grinder.  Just gently through them until we could see the bore.   Luckily no major cracks.

then measured top bottom & centre
Front = 2.900"   but missing 1/16" off the top
Rear = 2.928"    broken exhaust port

pistons require 3~4 thou clearance which means we would only be giving the machinist 9 thou to play with

So looks like I will have to get them sleeved

Update Tue 11th Oct
Going to try & hone the worst barrel to see if if it will clean up for the piston  .... worth the risk


Thursday, September 22, 2011

Bellcranks

The 741 rear hub arrived the other day, so I now have to decide whether to go for the chief hub or the 741 one.
I'm tempted to go for the 741 set up as the brake is on the left hand side & it is lighter.

I picked up the bell cranks from Murray Morell yesterday.
After getting them cad plated we noticed that the middle sleeve had 5ml taken off & prob done with a saw as it was not square
Rather than reduce the bush size we milled down the outside to square so we can place a spacer over the bush

Murray convinced me not to use helicoils ..... but to go for thread inserts ? ..... so I left the barrels with him rather than Harris engineering

We also checked the play in the valve guides which seemed ok.
They hadnt been honed ...... You need 5 thou clearance

Murray was worried that the guides weren't hardened so I've written to Moen @ IPE to find out what material was used & whether they have been hardened

Next job is to get the exhaust port fixed, head bolt threads fixed, barrels bored to 50 thou over & valves seated

Didnt make shed this week !

Wednesday, September 7, 2011

Update on the $'s - ouch

$2111

Been a little forgetful recording some of the bills
Trying to pretend I'm not really spending all the $'s

741 rear hub, shoes & cam from Jacob in USA         722
Front wheel spoked & 350x19 Avon tyre                  480
Labour & cad Murray Morrell                                    210
Labour & parts - bellcrank to frame studs                   699


Wednesday 8th Sept - shed night

Put the frame forks & seat  in the back of the car & headed up to the hills.
I stopped in at Midvale & Budgie from Spokes & Wheels had finished my front wheel.
Still a bit unsure of the blue & white paint job !


Wayne had cleared one of his bike stands so we set the frame up & put the front forks on.
Next we had to make a stepped bolt for the seat bracket on the lathe

Then we stood the tank in the frame & placed the wheel into the forks & had a first glimpse of the look of the bike.

woooooohooooo


Next job is keep grinding the exhaust port on the front barrel & then hopefully get them to Bob ? to be rebored ( pistons are 50 thou over ) & 3~4 helicoils inserted on stripped threads for the heads.


I wrote to the VI list to try & get an idea of how much we need to grind the fly wheels  ...... no responses yet


Sunday, September 4, 2011

rear hub

screwing the hub onto the brake plate
drilling out hub
Finished building the rear hub.

I wanted to get it done so I could lace up the rear wheel.

But I now realize I am creating a lot of work. A chief hub & brake plate wont fit into the 101 frame. It also has the brake on the RHS which wont work with the brake cross over.

I also realize that we cant get the wheel laced until its set up on the bike as the rim will need to be laced off center

So I've decided to hunt down a 741 rear hub & just found one in the USA     not cheap !!!!


NOS Hub & Brake Drum $225, Brake Plate $150, NOS Brake Shoe Set, no exchange $140,
Brake Cam $50, Brake Arm $75, Hollow Axle $45, Brake springs $6.00 pair, NOS 40 Tooth
Rear Sprocket $140.00.

Barrels

The front barrel exhaust port had broken off 
You can see that various people had tried to repair it in the past.
Cant get the barrels rebored until we fix it
We tried an electric stick welder but it wouldn't take.

Someone then suggested we try a cast iron alloy ??? stick and oxy it on.
This seemed to work and we gradually built up the port.

I spent some time grinding it back (including getting the metal dust in my eyes twice)
now that stings for 12 hours !

Cant get it back to round & a number of holes in the weld.
Murray had a look & thought it would be ok ... if we went over the cracks.


So will need to re weld it

Friday, September 2, 2011

Seat

I got all the bits of the seat blasted & powder coated & Chris gave me an old seat pan off a 30's chief to used as a mould.

How I made my seat:

Step 1
blast & paint old seat frame

Step 2
draw the shape of the seat onto a piece of cardboard folded in half, making sure it is symmetrical

Step 3
cut out 2 pieces of leather & one piece of wadding to go in between


Step 4
cut in a stitching line on the top piece & mark the stitching holes.
I clamped the 2 pieces together & used a dremel to cut holes in both pieces & then inserted a piece of wire every 6 holes to keep the pieces in line

Step 5
Wet the leather & mould it over seat pan using clamps & weights & then dry it
drying the seat on the heater

Step 6
added in another stitch pattern to the middle of the seat
Step 7
attach the bottom piece of leather to the seat pan making very sure it is symmetrical & that the stitching line is clearly shown.

Step 8
stitch on top piece & assemble seat

the final product

Wheels

Took the hubs & rims down to Southside Powder coaters to be blasted and painted.
taping wheels b4 spraying the white strip
I prob should have chosen black but instead went for black gloss on the hubs & royal blue on the rims. The front rim is a 19" off a Norton from the 40's & the back rim is 16" off my 47 chief. It is quite pitted with rust.

Got them home & taped them up & painted on an off white strip in the middle.
                                                                                                              Not sure about the color but I can always change it later.
Got some new bearings from Vintage & Modern in Maddington & rebuilt the hub.

Dropped the front wheel into Budgie's spoke business in Midland & will also get a 19x350 tyre put on.
Budgie noted the rim wasn't straight.
I should have panel beat it before painting. He will try & fix it.
I will pick up the wheel studs this morning from Murray & start building the rear hub & get that laced.
Could have a rolling chassis in the next few weeks !


before spokes
the front wheel finished !


Thursday, August 4, 2011

Wed 3rd August - update

Picked up a clutch pedal from Murray Morrell & left him with a few bits.
He will get the front fork bell crank & brake cross over cad plated before we put new bushes in the bell crank.

We also looked over the brake drum which will need to be ground level & decided to put larger wheel nuts in the drum.

Murray also put a bush in the front spring so that is now ready to be painted.

I took the 2 rims & hubs plus 20 other bits & pieces to Southside Powder coaters.
Total cost to have everything blasted & the rims & hubs painted was $110
Went for royal blue on the rime & black gloss for the hubs.
If it looks crap I will change it and get them done black.

Murray thinks he has found a front brake hub that is very similar to a 101 hub at the VMCC
If we can get it I might go with that option as it would be nice to have a front brake.

Changed the cleats on the foot boards & fitted them onto the bike. Took of a bit of paint !

Also fitted the brake lever & clutch pedal to the frame which looks good

Murray Morrell

Here's some pics of Murray Morrell & his shed
Murray can make every part for an Indian motorbike & is based in Perth
Quite amazing
at work on one of the many lathes

Murray Morrell


Friday, July 29, 2011

Wednesday 27th July - Shed night


Picked up the leaf spring from the suspension shop.
It looks ok & they only charged me $30.
Not 100% correct but it should work.

I bought 3 wheels up to shed....
one off the '47 chief (16" wheel),

The BSA front brake was to big so another error in my purchasing .... dammit

The 19" brit wheel was hopelessly out of round .... but we will use the hub & lace it to another 19" rim which Wayne gave to me.

I removed the spokes from the 16" wheel & got the bearings out of the hub. I will need to seal the middle before blasting.

Wayne & Andrew made a start on my front barrel. The exhaust port was broken. We tried to rebuild the metal with Chris's electric welder but the bronzing from previous fixes made the job impossible. We will now get it cut off & a piece threaded in.


Chris gave me an old seat pan from a 20's bike, complete with springs. The nuts had nearly rusted thru to the bolts.
I had to get the grinder out to cut the bolts. Luckily they all came away without damaging the pieces.
There are a lot of specialist bolts which I will need to get made in order to rebuild the seat.

These seats only have the rear of the pan with most of the saddle stretched leather. There is a bolt at the front which I guess is uses to straighten the leather as it stretches

Also had to grind off the spokes from the 19" rim.


The guy at Ironwigwam had forgotten to post the pistons so we are still waiting for these b4 we can start resizing the flywheels .

Wednesday, July 20, 2011

Incoming packages


A lot of the parts I ordered a few weeks ago have been arriving.
I seem to be getting a box a day.

Also bought a couple of wheels.
A 19" front wheel with brake from a 60's BSA & another 19" wheel without brake.
Hope I can use them
I'm still trying to work out what color to paint the tank, rims & back guard


I put the first coat of black on the frame .... which look ok.

Murray Morrel said I shouldn't put any bog on the frame, just powder coat as they rust from the inside & you want to be able to see the cracks !
I'm not going to change it now.

Decided to get the growing list of smaller parts powder coated though.
Much harder wearing, especially for the pedals.


I was going to collect the barrels from Wayne & get them bored as I'm expecting the pistons soon.
But wont happen as we have to rebuild the exhaust ports with an electric welder before we can bore them

Monday, July 4, 2011

sanding sanding sanding

put a 2nd coat of spray putty primer on the frame & forks .... takes ages to sand back
In hindsight I wish I had spent more time with the bog ... spray putty only hides v small imperfections
I've ended up sanding back to bare metal in spots using wet & dry & I noticed rust appearing DAMMIT
I'm hoping that wiping it clean & painting it with primer will be enough !

placed an order with Rocky at Iron Wigwam in the US for pistons .... so they should be here next week.

still need to sort out a front wheel & "leafs" for my leaf spring but should have enough to start building the engine soon.

Put a couple of coats on the leaf stays which look ok. Not perfect but I guess its a hill climber !

Not looking fwd to painting the wheel rims but I don't want chrome ! I guess preparing them will take some time.